Thursday, December 21, 2006

Find and Replace for multiline text


Many of us would have used "Find and Replace" option available in our IDE and in many of the text editors. This functionality finds a single line of text given and replaces with the given text in the current document as well as in the files under a given folder. But how would you find and replace a multiline text? In this article I have tried to explain that.
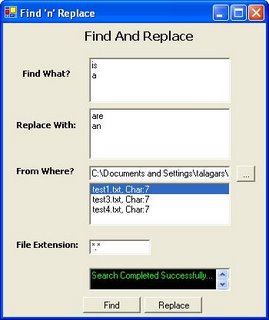

The project included in this article has a simple file reading operation. For the beginners first let me explain how to read files. You can skip this section if you are familiar with file operations.

File Operations

The first step is to include the System.IO namespace in the using directive.

using System.IO;

System.IO namespace has DirectoryInfo class which is used for typical operations such as copying, moving, renaming, creating, deleting and enumerating through directories and sub-directories. Files under a specific directory can be found using this class.

The following statement instantiates DirectoryInfo class with a folder path from the text box.

DirectoryInfo DI= new DirectoryInfo(txtFolder.Text);

To get the file information we use the following statement.

foreach(FileInfo FI in DI.GetFiles())

The GetFiles method of the DirectoryInfo class, returns an array of FileInfo object. The FileInfo class like DirectoryInfo has operations for reading, copying, moving, renaming, creating and deleting files.

Now we use a StreamReader object to read the file.

StreamReader SR= new StreamReader(FI.OpenRead());

We use the following statement to read a line and assign it to a string variable.

s=SR.ReadLine();

Search Operation

We read each line and store it in a temporary variable appending a new line character ("\r\n") at the end of the line.
This will differentiate each line for searching multiline text.

temp=temp+s+"\r\n";

Now to search the string we use IndexOf() method in the temporary variable with the search text as parameter.

pos=temp.IndexOf(txtFind.Text);

The above statement returns the position of the search text.
We use a list box to record the number of files that matches the search text and the occurence of the first position.

Replace Operation

For the replace functionality, we use Replace() method in the temporary variable with search string and string to replace as arguments.
temp=temp.Replace(txtFind.Text,txtReplace.Text);

To reflect this change in the actual file, we need to write it to the file. So we use StreamWriter object to write to the file.

StreamWriter SW= new StreamWriter(FI.OpenWrite());
SW.Write(temp);
SW.Close();
The source code for the project can be downloaded here.
For further reading and source code download
Thats all folks!!!

Thursday, November 16, 2006

Consuming a webservice from behind a proxy firewall

I was trying to access a webservice from my office which is behind a proxy firewall, I was annoyed by seeing the following error message

"- The request failed with HTTP status 407: Proxy Authentication Required"

I knew that it is something to do with the firewall proxy. So I googled my doubt and the error text but couldn't get a descent solution. Then I tried with the options in the command WSDL that we use to generate a proxy class (not to be confused with firewall proxy) for our webservice.

I found the following options.

/proxy:
/proxyusername:
/proxypassword:
/proxydomain:

But I didn't know how to use these options (I should admit that I am not good at DOS). Then I googled these options and got some answers which I am going to share with you now.

/proxy: is the url of the proxy server with the port number. For E.g., if your proxy server address is 255.255.255.255 and the port is 8001 then your proxy url is http://255.255.255.255:8001

/proxyusername: is the username of your proxy server and /proxypassword: is the password of your proxy server.

/proxydomain: is the domain name of your server.

So the WSDL command should be something like this.

c:\WSDL /proxy:http://255.255.255.255:8001
/proxyusername:uname
/proxypassword:pwd /proxydomain:lotus http://thiagu007.tk.105.webhostforasp.net/
service1.asmx?wsdl

The above command will download the proxy class file for the webservice.

But this is not the end of the show. We need to consume the service. The first thing we need to do is compile the class to a dll.

c:\csc.exe \t:library service1.cs

Then create a windows application project in Visual Studio and add the dll as a reference. Now you can use the class that is available in the dll and create an instance of it. But calling the web method from the webservice will again display the same error.

To resolve this you have to create a WebProxy. This is again the authenication information for firewall proxy.

To instantiate the WebProxy class you need to include the namespace System.Net in the "using" part.

using System.Net;

Now you can instantiate WebProxy class as follows,

// Instantiate the WebProxy class
WebProxy myProxy = new WebProxy(http://255.255.255.255:8001,true);
myProxy.Credentials = new NetworkCredential("uname", "pwd", "lotus");

Now, the proxy should be assigned to the Service class and the function can be called.

// Instantiate the WebService class
Service1 sr=new Service1();
sr.Proxy =myProxy; // Set the proxy to the class
String str=sr.HelloWorld(); // Calling the web method

This will call the method that is available in the webservice by authenticating the proxy server's credentials.

Happy Coding :)

Monday, November 06, 2006

Dynamic Code Compilation

Welcome to dynamic code compilation. This article throws light on how a code can be built dynamically, compiled and run. The scenario of dynamic code compilation may arise when you want an application to upgrade (or rewrite) another application.
Lets jump in to coding. The namespaces that we are going to use in this project are
  • System.CodeDom
  • System.CodeDom.Compiler
  • Microsoft.CSharp
The System.CodeDom namespace contains classes that can be used to represent the elements and structure of a source code document. The classes in this namespace can be used to model the structure of a source code document that can be output as source code in a supported language using the functionality provided by the System.CodeDom.Compiler namespace.

The Microsoft.CSharp namespace contains classes that support compilation and code generation using the C# language.

At first we need to instantiate the class CSharpCodeProvider. Then create a complier using CreateCompiler() function of CSharpCodeProvider class and assign to the interface ICodeCompiler.

CSharpCodeProvider codeProvider = new CSharpCodeProvider();
ICodeCompiler icc = codeProvider.CreateCompiler();

Then set the parameters for the compiler using CompilerParameters class. Set parameters like GenerateExecutable, OutputAssembly

System.CodeDom.Compiler.CompilerParameters parameters = new CompilerParameters();
parameters.GenerateExecutable = true;
parameters.OutputAssembly = "Out.exe";

Now declare a String variable and write the source code for the new application/program. Now instantiate CompilerResults class with compiler parameters and the source code as below.

String sourcecode;
sourcecode="using System;namespace SampleApp{class Class1{[STAThread] static void Main(string[] args) { Console.WriteLine(\"I am born to live!\");Console.Read(); } }}";
CompilerResults results = icc.CompileAssemblyFromSource(parameters,sourcecode);

Now the code is compiled. If you want to run the compiled EXE, start the process by

Process.Start("Out.exe");

Thats all folks!....
Happy coding

Wednesday, July 12, 2006

Calling APIs, The .Net Way!

What is Windows API?

The Windows API is the name given by Microsoft to the core set of application programming interfaces available in the Microsoft Windows operating systems. It is designed for usage by C/C++ programs and is the most direct way to interact with a Windows system for software applications.

The functionality provided by the Windows API can be grouped into various categories like Base Services, Graphics Device Interface, User Interface, Common Dialog Box Library, Common Control Library, Windows Shell, Network Services.


The .Net Way!


Now we will see how to call an API function in .Net. As we all know that .Net supports Interop Services, its very easy to call an API function using the namespace "System.Runtime.InteropServices".

Before going to the coding section, lets start with an example. Here I am going to use Windows API for hiding the mouse cursor and showing it back. For this purpose, I am going to use the API user32.ShowCursor function which is under the category User Interface.

Let us start the coding by first including the namespace "System.Runtime.InteropServices". This namespace provides a wide variety of members that support COM interop and platform invoke services.


using System.Runtime.InteropServices;

Then comes the declaration part. Here we declare the API function that we are going to use. Here we have to specify the dll to which the function refers. In our case it is User32.dll.

[DllImport("user32.dll")]
static extern int ShowCursor(bool bShow);

The Statement DllImport is an attribute which you use to define platform invoke methods for accessing unmanaged APIs. This definition should be made inside the main class like other member functions and variables.

The interesting part is calling the API function. It is very straight forward. Just use the following statement.

ShowCursor(false); // Hide cursor

ShowCursor(true); // Show cursor

Some Tips...

For beginners, implementing APIs is a tough job. There is a quick reference website (www.pinvoke.net) which provides the structure and sample code (sometimes) for all the APIs. But first you need to know which API function is needed for your use. You can find it easily by searching in Google. Happy Coding!


Friday, July 07, 2006

Excel Automation in .Net

Excel Automation is a buzz word in both webapps and winapps. In the programming life (like Mr.Anderson neo) I guess almost every one could have come across this word. For others let me go further in detail. Excel Automation is automating some or all of the process involved in creating or updating excel worsheets.

The real life scenario of an excel automation can be a daily account maintenance where you have an excel sheet template with graphs and calculations already in place except the data. So you want the data to be pulled in from a database and written to the excel sheet. After this the template takes care of the data by manipulating for graph generation.

For the above said scenario we can go for a simple console application in .Net. Why I didn't go for an ASP.Net web application? Because running a web application requires a browser to be opened and closed. This becomes tedious when you schedule the process using windows scheduler to occur in particular intervals. And running a console based application is quite easy.


Pardon me for beating around the bush. Now let us jump in to the good part (coding). For this automation process we need to follow the below steps

1. Add a referrence to the Microsoft Excel object library COM component.
2. Add the namespace Excel
3. Instantiate the class Excel.ApplicationClass as below


Excel.Application xl=new Excel.ApplicationClass();

4. To open an excel file,

Excel.Workbook wb=xl.Workbooks.Open(Environment.CurrentDirectory+"/SampleExcel.xls",0, false, 5, System.Reflection.Missing.Value, System.Reflection.Missing.Value, false, System.Reflection.Missing.Value, System.Reflection.Missing.Value,true, false, System.Reflection.Missing.Value, false, false, false); //Open the excel sheet

5. To read cell(s) in the worksheet,

Excel.Sheets xlsheets=wb.Sheets; //Get the sheets from workbook
Excel.Worksheet excelWorksheet = (Excel.Worksheet)xlsheets[1]; //Select the first sheet
Excel.Range excelCell = (Excel.Range)excelWorksheet.get_Range("B4:FZ4",Type.Missing); //Select a range of cells
Excel.Range excelCell2 = (Excel.Range)excelWorksheet.get_Range("A5:A5",Type.Missing); //Select a single cell
Console.WriteLine(excelCell2.Cells.Value2.ToString()); //Print the value of the cell for a single cell selection
System.Array myvalues = (System.Array)excelCell.Cells.Value2; //Assign it to an array
string[] strArray = ConvertToStringArray(myvalues); //Convert array into String array
foreach (string str in strArray)
Console.WriteLine(" Text in Cell " + str); //Loop through the array to print the values in the cell


6. To save a value in a cell
excelCell2.Cells.Value2="SampleText"; //Assign a value to the cell
wb.Save(); //Save the workbook


7. Finally Quit the Excel Application
xl.Quit();

Thursday, July 06, 2006

Passing Data Between Forms - WinForms

Some of you would have faced a scenario where you wanted to pass data from one form to another in WinForms. Honestly, I too had a similar problem (that’s why I am writing this article!).

There are so many methods (How many? I don’t know) to pass data between forms in windows application. In this article let me take four important (easiest) ways of accomplishing this.


  1. Using constructor
  2. Using objects
  3. Using properties
  4. Using delegates


The Constructor Approach


This could be the easiest method of all. A method is invoked whenever you instantiate an object. This method is called a constructor. Code a constructor for form2 class with one string parameter. In the constructor assign the text to the label’s text property. Instantiate form2 class in form1’s button click event handler using the constructor with one string parameter and pass the textbox’s text to the constructor.


The Object Approach


Objects are reference types, and are created on the heap, using the keyword new. Here we are going to pass data using objects. The approach is simple; in form2 we are going to instantiate form1 class. Then instantiate form2 in the button click event handler of form1. After this we are going to pass form1 object to the form2 using form2’s form1 object. The last step is to invoke the form2 window by calling the form2’s show method.


The Properties Approach


Properties allow clients to access class state as if they were accessing member fields directly, while actually implementing that access through a class method. In this method we are going to add one property to each form. In form1 we are going to use one property for retrieving value from the textbox and in form2, one property to set the label’s text property. Then, in form1’s button click event handler we are going to instantiate form2 and use the form2’s property to set the label’s text.


The Delegates Approach


Technically, a delegate is a reference type used to encapsulate a method with a specific signature and return type. You can encapsulate any matching method in that delegate. Here we are going to create a delegate with some signature and assign a function to the delegate to assign the text from textbox to label.


Winding up...


These four approaches are very simple in implementing data passing between forms. There are also other methods available in accomplishing the same. Source code for the methods I stated above is given at the top for download. It is time for you to put your thinking cap and find other ways of doing this. Happy Coding!!!


For source code and further reading...