What is Windows API?
The Windows API is the name given by Microsoft to the core set of application programming interfaces available in the Microsoft Windows operating systems. It is designed for usage by C/C++ programs and is the most direct way to interact with a Windows system for software applications.
The functionality provided by the Windows API can be grouped into various categories like Base Services, Graphics Device Interface, User Interface, Common Dialog Box Library, Common Control Library, Windows Shell, Network Services.
The .Net Way!
Now we will see how to call an API function in .Net. As we all know that .Net supports Interop Services, its very easy to call an API function using the namespace "System.Runtime.InteropServices".
Before going to the coding section, lets start with an example. Here I am going to use Windows API for hiding the mouse cursor and showing it back. For this purpose, I am going to use the API user32.ShowCursor function which is under the category User Interface.
Let us start the coding by first including the namespace "System.Runtime.InteropServices". This namespace provides a wide variety of members that support COM interop and platform invoke services.
using System.Runtime.InteropServices;
Then comes the declaration part. Here we declare the API function that we are going to use. Here we have to specify the dll to which the function refers. In our case it is User32.dll.
[DllImport("user32.dll")]
static extern int ShowCursor(bool bShow);
The Statement DllImport is an attribute which you use to define platform invoke methods for accessing unmanaged APIs. This definition should be made inside the main class like other member functions and variables.
The interesting part is calling the API function. It is very straight forward. Just use the following statement.
ShowCursor(false); // Hide cursor
ShowCursor(true); // Show cursor
Some Tips...
For beginners, implementing APIs is a tough job. There is a quick reference website (www.pinvoke.net) which provides the structure and sample code (sometimes) for all the APIs. But first you need to know which API function is needed for your use. You can find it easily by searching in Google. Happy Coding!
Wednesday, July 12, 2006
Friday, July 07, 2006
Excel Automation in .Net
Excel Automation is a buzz word in both webapps and winapps. In the programming life (like Mr.Anderson neo) I guess almost every one could have come across this word. For others let me go further in detail. Excel Automation is automating some or all of the process involved in creating or updating excel worsheets.
The real life scenario of an excel automation can be a daily account maintenance where you have an excel sheet template with graphs and calculations already in place except the data. So you want the data to be pulled in from a database and written to the excel sheet. After this the template takes care of the data by manipulating for graph generation.
For the above said scenario we can go for a simple console application in .Net. Why I didn't go for an ASP.Net web application? Because running a web application requires a browser to be opened and closed. This becomes tedious when you schedule the process using windows scheduler to occur in particular intervals. And running a console based application is quite easy.
Pardon me for beating around the bush. Now let us jump in to the good part (coding). For this automation process we need to follow the below steps
1. Add a referrence to the Microsoft Excel object library COM component.
2. Add the namespace Excel
3. Instantiate the class Excel.ApplicationClass as below
Excel.Application xl=new Excel.ApplicationClass();
Excel.Sheets xlsheets=wb.Sheets; //Get the sheets from workbook
Excel.Worksheet excelWorksheet = (Excel.Worksheet)xlsheets[1]; //Select the first sheet
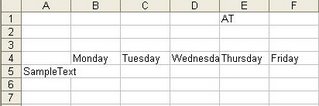
Excel.Range excelCell = (Excel.Range)excelWorksheet.get_Range("B4:FZ4",Type.Missing); //Select a range of cells
Excel.Range excelCell2 = (Excel.Range)excelWorksheet.get_Range("A5:A5",Type.Missing); //Select a single cell
Console.WriteLine(excelCell2.Cells.Value2.ToString()); //Print the value of the cell for a single cell selection
System.Array myvalues = (System.Array)excelCell.Cells.Value2; //Assign it to an array
string[] strArray = ConvertToStringArray(myvalues); //Convert array into String array
foreach (string str in strArray)
Console.WriteLine(" Text in Cell " + str); //Loop through the array to print the values in the cell

6. To save a value in a cell
excelCell2.Cells.Value2="SampleText"; //Assign a value to the cell
wb.Save(); //Save the workbook
7. Finally Quit the Excel Application
xl.Quit();
The real life scenario of an excel automation can be a daily account maintenance where you have an excel sheet template with graphs and calculations already in place except the data. So you want the data to be pulled in from a database and written to the excel sheet. After this the template takes care of the data by manipulating for graph generation.
For the above said scenario we can go for a simple console application in .Net. Why I didn't go for an ASP.Net web application? Because running a web application requires a browser to be opened and closed. This becomes tedious when you schedule the process using windows scheduler to occur in particular intervals. And running a console based application is quite easy.
Pardon me for beating around the bush. Now let us jump in to the good part (coding). For this automation process we need to follow the below steps
1. Add a referrence to the Microsoft Excel object library COM component.
2. Add the namespace Excel
3. Instantiate the class Excel.ApplicationClass as below
Excel.Application xl=new Excel.ApplicationClass();
4. To open an excel file,
Excel.Workbook wb=xl.Workbooks.Open(Environment.CurrentDirectory+"/SampleExcel.xls",0, false, 5, System.Reflection.Missing.Value, System.Reflection.Missing.Value, false, System.Reflection.Missing.Value, System.Reflection.Missing.Value,true, false, System.Reflection.Missing.Value, false, false, false); //Open the excel sheet
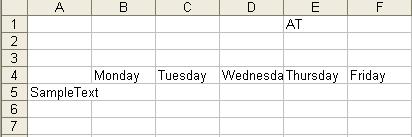
5. To read cell(s) in the worksheet,Excel.Sheets xlsheets=wb.Sheets; //Get the sheets from workbook
Excel.Worksheet excelWorksheet = (Excel.Worksheet)xlsheets[1]; //Select the first sheet
Excel.Range excelCell = (Excel.Range)excelWorksheet.get_Range("B4:FZ4",Type.Missing); //Select a range of cells
Excel.Range excelCell2 = (Excel.Range)excelWorksheet.get_Range("A5:A5",Type.Missing); //Select a single cell
Console.WriteLine(excelCell2.Cells.Value2.ToString()); //Print the value of the cell for a single cell selection
System.Array myvalues = (System.Array)excelCell.Cells.Value2; //Assign it to an array
string[] strArray = ConvertToStringArray(myvalues); //Convert array into String array
foreach (string str in strArray)
Console.WriteLine(" Text in Cell " + str); //Loop through the array to print the values in the cell

6. To save a value in a cell
excelCell2.Cells.Value2="SampleText"; //Assign a value to the cell
wb.Save(); //Save the workbook
7. Finally Quit the Excel Application
xl.Quit();
Thursday, July 06, 2006
Passing Data Between Forms - WinForms
Some of you would have faced a scenario where you wanted to pass data from one form to another in WinForms. Honestly, I too had a similar problem (that’s why I am writing this article!).
There are so many methods (How many? I don’t know) to pass data between forms in windows application. In this article let me take four important (easiest) ways of accomplishing this.
There are so many methods (How many? I don’t know) to pass data between forms in windows application. In this article let me take four important (easiest) ways of accomplishing this.
- Using constructor
- Using objects
- Using properties
- Using delegates
The Constructor Approach
This could be the easiest method of all. A method is invoked whenever you instantiate an object. This method is called a constructor. Code a constructor for form2 class with one string parameter. In the constructor assign the text to the label’s text property. Instantiate form2 class in form1’s button click event handler using the constructor with one string parameter and pass the textbox’s text to the constructor.
The Object Approach
Objects are reference types, and are created on the heap, using the keyword new. Here we are going to pass data using objects. The approach is simple; in form2 we are going to instantiate form1 class. Then instantiate form2 in the button click event handler of form1. After this we are going to pass form1 object to the form2 using form2’s form1 object. The last step is to invoke the form2 window by calling the form2’s show method.

The Properties Approach
The Delegates Approach
Winding up...
These four approaches are very simple in implementing data passing between forms. There are also other methods available in accomplishing the same. Source code for the methods I stated above is given at the top for download. It is time for you to put your thinking cap and find other ways of doing this. Happy Coding!!!
For source code and further reading...
Subscribe to:
Posts (Atom)